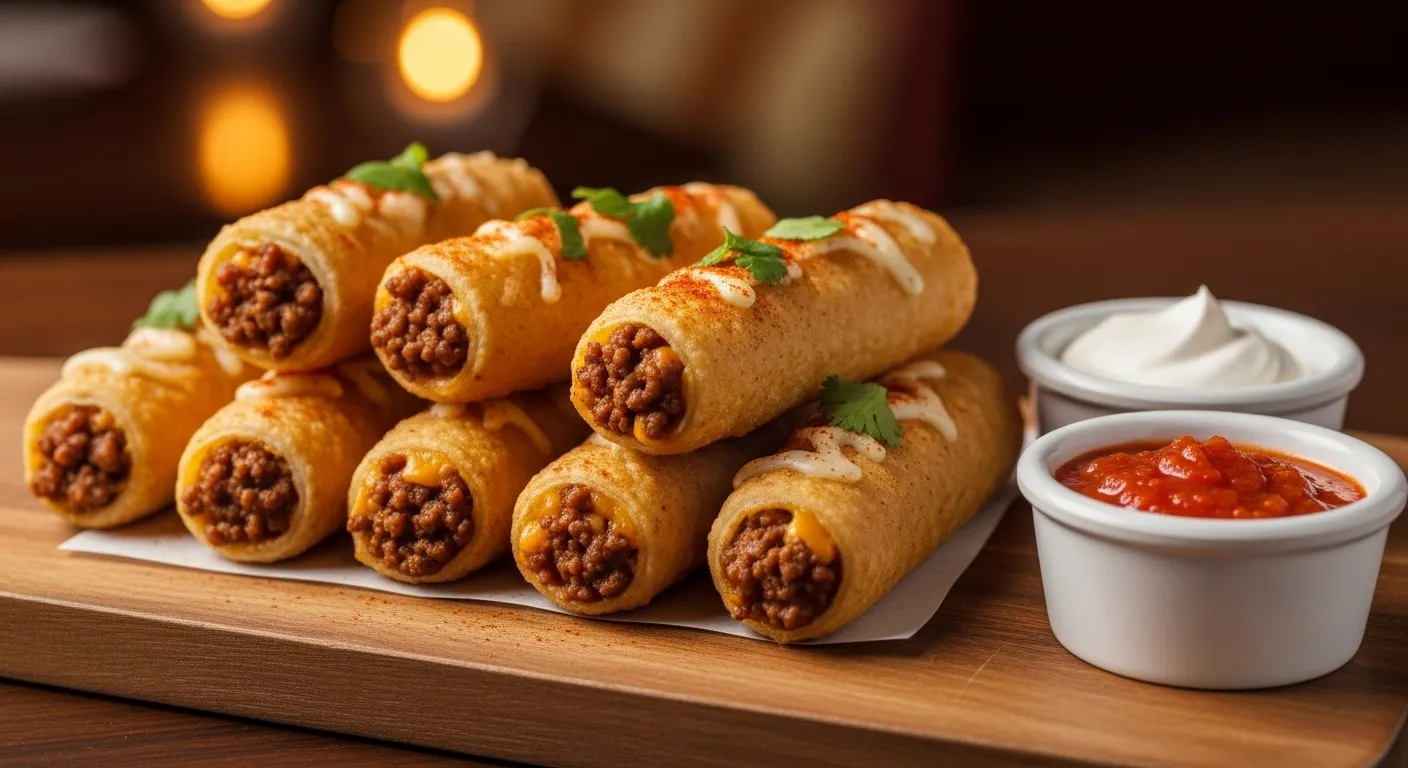
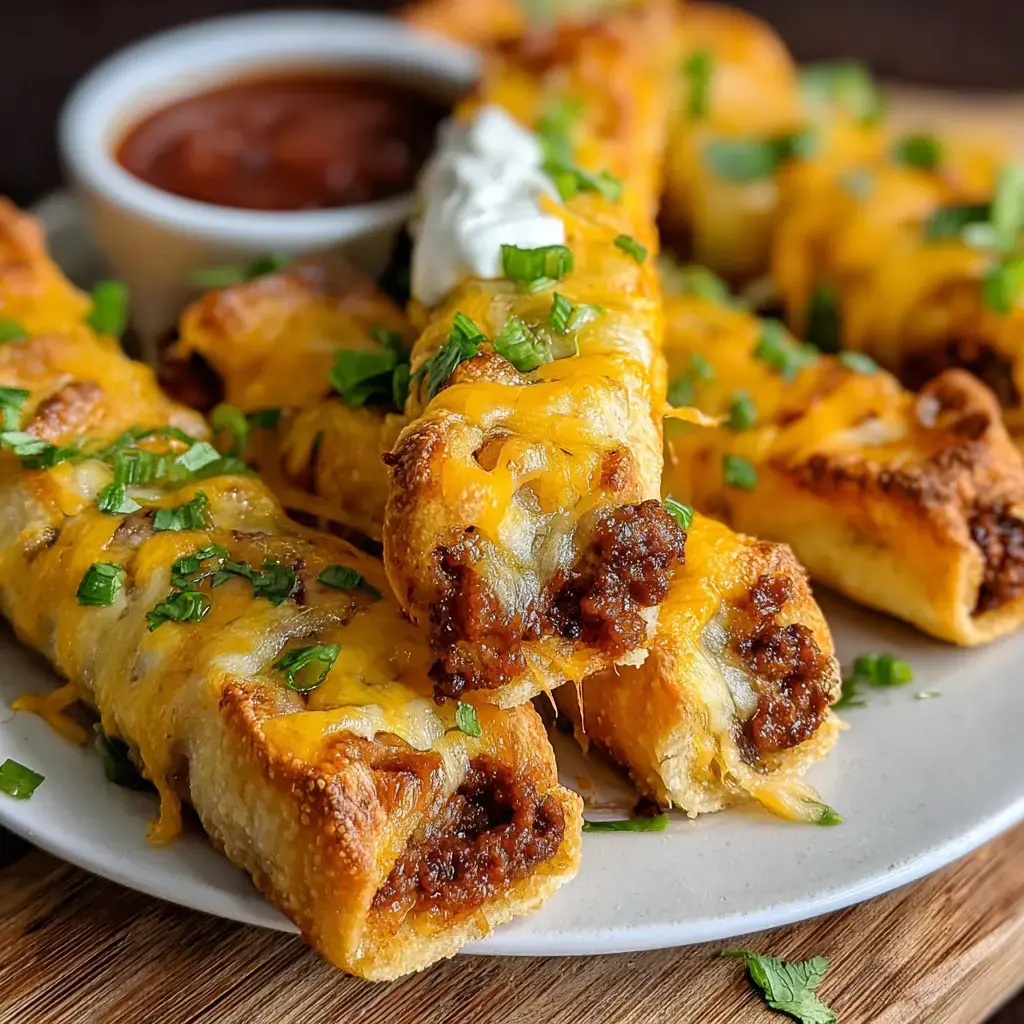
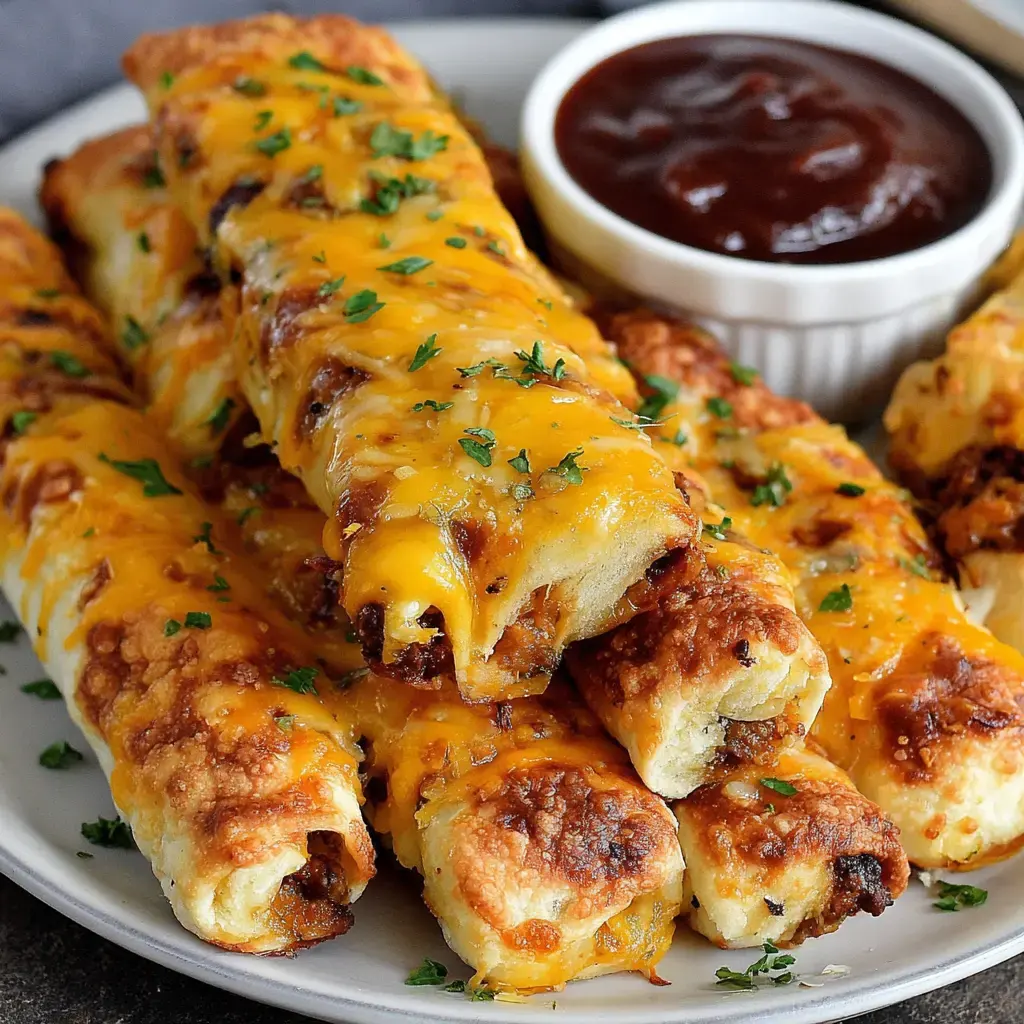
Cheesy Taco Sticks Recipe – Easy Crispy Snack for Game Day
Crispy, cheesy, and packed with bold Tex-Mex flavors, this Cheesy Taco Sticks Recipe is the ultimate hand-held comfort food with a fun twist. This crowd-pleasing dish features seasoned ground beef wrapped in flaky crescent dough with gooey melted cheese, all baked to golden perfection. It’s the kind of snack that fills the whole house with mouthwatering aromas and has everyone reaching for seconds.
Each bite delivers a satisfying combo of textures—crispy flaky crust, savory seasoned meat, and stretchy melted cheese. Whether you’re cooking for game day, after-school snacks, or feeding a hungry crowd, this Cheesy Taco Sticks Recipe is as easy to make as it is to love. Add your favorite toppings like sour cream, guacamole, salsa, or jalapeños for a colorful, customizable treat that feels like a fiesta.
Why You’ll Love This Cheesy Taco Sticks Recipe
- Kid-friendly favorite: Fun to eat, easy to hold, and packed with flavors kids actually love—no complaints at dinner time.
- Party perfect: Great for game day, potlucks, birthday parties, or any gathering where finger foods shine.
- Budget-friendly: Uses simple, affordable ingredients you probably already have in your pantry and fridge.
- Quick and easy: Ready in under 30 minutes from start to finish—perfect for busy weeknights.
- Endlessly customizable: Change the meat, add beans, switch up the cheese, or make them vegetarian with ease.
Preparation Phase & Tools to Use (Essential Tools and Equipment, Plus Why They Matter)
Before diving into this delicious Cheesy Taco Sticks Recipe, having the right tools on hand will make everything smoother—from prep to clean-up.
Essential Tools & Why You Need Them:
Large Baking Sheet
This is essential for baking the taco sticks evenly. A rimmed baking sheet prevents any cheese or filling from spilling over into your oven.
Parchment Paper or Silicone Baking Mat
Prevents sticking and makes cleanup a breeze. Your taco sticks will release perfectly every time.
Large Skillet or Frying Pan
For browning the ground beef and mixing in all those delicious taco seasonings evenly.
Wooden Spoon or Spatula
Perfect for breaking up the meat while cooking and ensuring even seasoning distribution.
Sharp Knife or Pizza Cutter
Makes cutting the crescent dough into sticks quick and precise without tearing.
Measuring Spoons & Cups
Accuracy matters—especially for the taco seasoning blend to get that perfect flavor balance.
Having these items prepped and within reach makes the cooking process seamless and enjoyable.
Preparation Tips
- Let the crescent dough sit at room temperature for 5-10 minutes before unrolling—this prevents tearing and makes it easier to work with.
- Drain excess grease thoroughly after browning the beef to prevent soggy taco sticks.
- Don’t overfill the dough—too much filling makes them hard to seal and can cause bursting during baking.
- Seal the edges well by pressing firmly with a fork or pinching tightly to keep all that cheesy goodness inside.
- Brush with butter before baking for extra golden, crispy edges with irresistible flavor.
- Cool slightly before serving: Let the taco sticks rest for 3-5 minutes after baking so the cheese sets slightly and they’re easier to handle.
These small touches make a big difference in achieving perfectly crispy, leak-free taco sticks.
Ingredients for This Cheesy Taco Sticks Recipe
Here’s everything you’ll need to bring these bold, satisfying taco sticks to life. Most of the ingredients are pantry staples, making this recipe both budget-friendly and easy to whip up on short notice.
For the Taco Filling:
- 1 lb ground beef (or ground turkey)
- 1 small onion, finely diced
- 2 cloves garlic, minced
- 2 tablespoons taco seasoning (store-bought or homemade)
- ¼ cup water
- ½ cup canned black beans, drained and rinsed (optional)
- ½ cup corn kernels, drained (optional)
- Salt and pepper to taste
- 1 tablespoon olive oil (for cooking)
For the Taco Sticks:
- 2 cans (8 oz each) refrigerated crescent roll dough
- 1½ cups shredded Mexican blend cheese (or cheddar)
- 2 tablespoons melted butter
- 1 teaspoon garlic powder (for brushing)
- Optional: 1 tablespoon chopped fresh cilantro
Optional Toppings & Dipping Sauces:
- Sour cream
- Salsa (mild or spicy)
- Guacamole
- Pico de gallo
- Shredded lettuce
- Diced tomatoes
- Sliced jalapeños
- Hot sauce
Everything in this list balances flavor and texture—the crispy dough contrasts beautifully with the cheesy, seasoned filling. The toppings are optional but give these taco sticks a fresh, authentic Tex-Mex finish.
Step 1: Prepare the Taco Filling
In a large skillet, heat 1 tablespoon of olive oil over medium heat. Add the diced onion and sauté until softened, about 3-4 minutes. Stir in the minced garlic and cook for 30 seconds, just until fragrant.
Add the ground beef and cook until browned, breaking it apart with a spoon as it cooks. Once fully cooked, drain any excess grease thoroughly. Return the skillet to the heat and stir in the taco seasoning and water. Simmer for 2-3 minutes until the mixture thickens. If using, add the black beans and corn, stirring to combine. Remove from heat and let cool slightly.
Step 2: Prepare the Dough
Preheat your oven to 375°F (190°C) and line a large baking sheet with parchment paper. Unroll the crescent dough and separate it into triangles. Using a knife or pizza cutter, cut each triangle in half lengthwise to create two thinner strips, giving you 16 total strips from each can.
Step 3: Fill and Roll the Taco Sticks
Place about 2 tablespoons of the taco meat filling along the center of each dough strip. Sprinkle generously with shredded cheese (about 1-2 tablespoons per stick). Fold the dough over the filling lengthwise and press the edges firmly to seal, creating a stick shape. You can use a fork to crimp the edges for extra security.
Place the sealed taco sticks seam-side down on the prepared baking sheet, spacing them about 1 inch apart.
Step 4: Add the Finishing Touch
In a small bowl, mix the melted butter with garlic powder. Brush this mixture generously over the top of each taco stick. This creates a beautiful golden color and adds extra flavor. If desired, sprinkle with chopped cilantro for a fresh touch.
Step 5: Bake to Perfection
Transfer the baking sheet to the preheated oven and bake for 12-15 minutes, or until the taco sticks are golden brown and the cheese is melted and bubbling. Keep an eye on them in the last few minutes to prevent over-browning.
Remove from the oven and let cool for 3-5 minutes before serving. Arrange on a platter with your favorite dipping sauces and toppings. Serve warm and watch them disappear!
Notes
Make It Spicier: Add diced jalapeños to the filling, use pepper jack cheese, or mix hot sauce into the meat mixture for extra kick.
Vegetarian Version: Skip the beef and use refried beans, black beans, or a plant-based ground meat alternative seasoned with taco spices.
Cheese Options: Experiment with different cheeses like Monterey Jack, queso fresco, or a sharp cheddar for varied flavors.
Watch Out for These Mistakes While Cooking
- Not draining the beef well: Excess grease makes the dough soggy and prevents proper crisping. Always drain thoroughly.
- Overfilling the dough strips: Too much filling causes the sticks to burst open during baking. Stick to 2 tablespoons of filling per stick.
- Not sealing the edges properly: Poorly sealed taco sticks leak cheese everywhere. Press firmly and crimp with a fork for best results.
- Skipping the butter brush: The butter creates that beautiful golden crust. Don’t skip this step for maximum flavor and color.
- Baking at too high a temperature: Too hot and the outside burns before the inside heats through. Stick to 375°F for even baking.
- Using cold dough: Cold dough tears easily and is hard to work with. Let it sit at room temperature briefly before handling.
- Crowding the baking sheet: Taco sticks need space for air circulation. Overcrowding leads to uneven baking and soggy bottoms.
- Cutting into them too soon: Hot cheese will run everywhere. Let them rest a few minutes so the cheese sets slightly.
What to Serve With Cheesy Taco Sticks Recipe?
This fun and flavorful finger food is satisfying on its own, but pairing it with the right sides can transform it into a complete Tex-Mex feast. Whether you’re going light or indulgent, there’s a side dish for every vibe.
8 Delicious Recommendations:
Mexican Rice (Spanish Rice)
Fluffy, tomato-infused rice with peppers and spices makes a classic, filling side that complements perfectly.
Refried Beans
Creamy, seasoned beans add protein and authentic flavor. Serve with a sprinkle of cheese on top.
Chips and Guacamole
Fresh, creamy guacamole with crispy tortilla chips is always a crowd-pleaser and keeps the party vibe going.
Mexican Street Corn Salad (Esquites)
Charred corn with mayo, lime, cotija cheese, and chili powder brings sweet, tangy, and spicy notes.
Simple Garden Salad with Lime Vinaigrette
Fresh greens, tomatoes, and cucumber with a zesty lime dressing provide a light, refreshing contrast.
Tortilla Soup
A warm, flavorful soup with tortilla strips, avocado, and cheese rounds out the meal beautifully.
Pico de Gallo
Fresh chopped tomatoes, onions, cilantro, and lime juice add brightness and crunch to every bite.
Churros (for dessert)
Keep the fiesta going with crispy, cinnamon-sugar churros and chocolate sauce for dipping.
These pairings help round out the meal and bring a fun, festive atmosphere to your dinner table.
Storage Instructions
This Cheesy Taco Sticks Recipe stores well and makes great leftovers or make-ahead party food.
How to Store:
Refrigerator: Let the taco sticks cool completely, then store in an airtight container. They will keep in the fridge for up to 3 days.
Freezer: For longer storage, wrap cooled taco sticks individually in plastic wrap, then place in a freezer-safe bag or container. Freeze for up to 2 months.
Reheating:
Oven: Reheat at 350°F (175°C) on a baking sheet for 8-10 minutes or until heated through and crispy again.
Air Fryer: Reheat at 350°F for 5-6 minutes for extra crispy results.
Microwave: Heat individual sticks on medium power for 1-2 minutes. Note that they won’t be as crispy as oven reheating.
Always ensure internal temperature reaches 165°F (74°C) when reheating.
Estimated Nutrition (Per Serving – Based on 8 Servings)
Please note this is an approximate breakdown and may vary based on exact ingredients used.
| Nutrient | Amount Per Serving |
|---|---|
| Calories | 380 |
| Protein | 18g |
| Carbohydrates | 28g |
| Dietary Fiber | 2g |
| Sugar | 4g |
| Total Fat | 22g |
| Saturated Fat | 10g |
| Unsaturated Fat | 10g |
| Trans Fat | 0g |
| Cholesterol | 65mg |
| Sodium | 780mg |
This dish delivers a satisfying balance of protein, carbs, and fats—great for a fun lunch or dinner that keeps everyone happy.
Frequently Asked Questions
1. Can I make this Cheesy Taco Sticks Recipe ahead of time?
Absolutely. Assemble the taco sticks completely, cover tightly, and refrigerate for up to 24 hours before baking. Let them sit at room temperature for 10 minutes before baking.
2. Can I use a different type of meat?
Yes! Ground turkey, chicken, pork, or even plant-based crumbles work wonderfully. Just season generously to maintain that bold taco flavor.
3. Can I make these in an air fryer?
Definitely. Air fry at 350°F (175°C) for 8-10 minutes, flipping halfway through, until golden brown and crispy.
4. What if I don’t have crescent roll dough?
No problem. Use pizza dough, puff pastry, or even flour tortillas cut into strips as alternatives with slightly different textures.
5. Can I make them spicy?
Absolutely. Add diced jalapeños, use hot taco seasoning, include pepper jack cheese, or serve with spicy salsa for extra heat.
6. Can I freeze unbaked taco sticks?
Yes! Assemble completely, freeze on a baking sheet until solid, then transfer to freezer bags. Bake from frozen, adding 3-5 extra minutes to the baking time.
7. How do I prevent cheese from leaking out?
Make sure edges are sealed tightly by pressing with a fork, don’t overfill, and place seam-side down on the baking sheet.
8. Can I make a breakfast version?
Of course! Use scrambled eggs, breakfast sausage, cheese, and peppers for a delicious breakfast twist on this Cheesy Taco Sticks Recipe.
Conclusion
This Cheesy Taco Sticks Recipe is the ultimate fusion of taco flavors and handheld convenience—all baked into one irresistible snack. With its crispy golden crust, savory seasoned filling, and melty cheese center, it’s everything you love about tacos, minus the mess.
Perfect for parties, game day, weeknight dinners, or after-school snacks, this Cheesy Taco Sticks Recipe is as versatile as it is delicious. Plus, with endless topping and customization options, it never gets boring. So grab your baking sheet and make something everyone will devour!
Cheesy Taco Sticks Recipe
Ingredients
Equipment
Method
- Preheat oven to 375°F (190°C).
- Heat olive oil in a skillet over medium heat.
- Add ground beef and cook until browned.
- Stir in taco seasoning and cook for 2 minutes.
- Remove beef from heat and let cool slightly.
- Roll out pizza dough and cut into equal strips.
- Place seasoned beef and cheeses onto each strip.
- Roll dough around filling to form sticks.
- Place sticks seam-side down on baking sheet.
- Brush tops with melted butter and sprinkle garlic powder.
- Bake for 12–15 minutes until golden brown.
- Garnish with fresh parsley and serve warm.
Video
Notes
- Substitute ground beef with ground turkey or plant-based meat.
- Serve with salsa, sour cream, or guacamole for dipping.
- Best enjoyed fresh while cheese is melted.
- Store leftovers in the refrigerator for up to 2 days.